List of Dark Souls 2 Bosses Ds2 Looking Glass Knight Art
Dark Souls 2 offers more bosses than any of the other Dark Souls games. Equally said past many people, it beats out the other Souls games with quantity but not quality. Many of the bosses have unfair advantages that one doesn't discover in the other Dark Souls games. Some boss fights throw the player into a ane versus three scenario that for many new players is overwhelming. Other bosses use typical one-hit-kill maneuvers that, if defenseless off guard, tin can end even an experienced players' perfect run.
When counted out, Dark Souls 2 has over 30 bosses that are fix to steal the Bearer of the Curse's souls time and time once again. It'due south worth noting that some boss battles come with more than than ane dominate, sometimes with a three against 1 scenario. These are some of the most difficult of the lot.
Updated: September ninth, 2021, By Aden Carter: Players are steadily making their way dorsum to playing the Dark Souls trilogy thanks to the upcoming game, Elden Ring. The hype has brought new players to the series and now is a great time to try it out. The Demon'south Souls remake was not released too long ago, and other games like Bloodborne are all the same worthwhile. All of these games are sure to prepare players for the hereafter of the Souls series every bit it is taken to heights that information technology has never gone before. With players coming dorsum to Dark Souls ii, it is fourth dimension to take a look at how to defeat some bosses that players might struggle with.
15 Mytha, The Baneful Queen
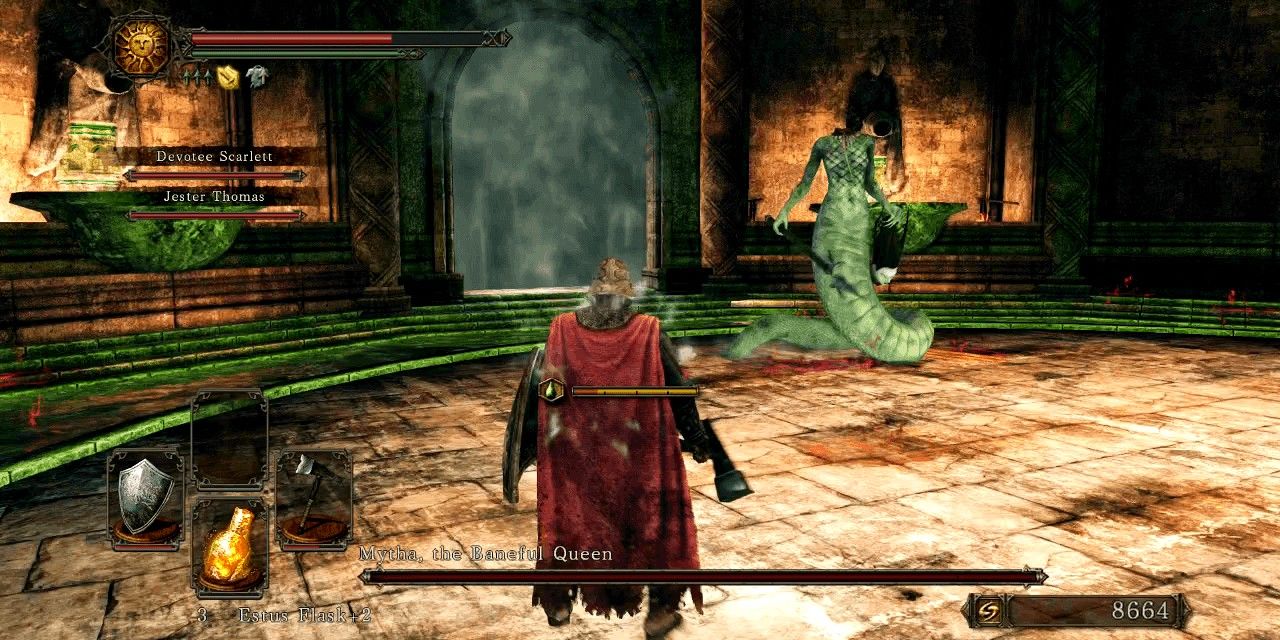
As in that location are often very few hints to the obscure mechanics that can be found in Dark Souls 2, players may run into challenges that they are woefully underprepared for. One such occurrence is while fighting Mytha, the Baneful Queen in the Earthen Peak.
If i does not burn the windmill in this area, the boss room volition exist filled with green slime that volition not just poison the player, but heal Mytha as well. Subsequently setting the blades of the mill aflame, the player will also proceeds access to Jester Thomas equally a summon, which tin can help out players struggling with this boss.
Tips For Defeating Mytha
Before the fight, make sure to travel to where the windmill blades are and fire them. This will make the fight easier by draining some of the toxicant in the dominate arena. The arena is typically covered in toxicant, but when the windmill is burned, the poison will only be on the edge.
Mytha typically attacks with her spear 2 or three times in a row, before leaving an opening for attack. Wait for the opening and strike once or twice, then set for another assail. Heed for screams, which indicate the magic beam set on that fires from her severed head. Finally, try not to stand backside her for too long. This will typically cause her to utilize her tail attack to grab the player, dealing harsh damage.
xiv The Ruin Sentinels
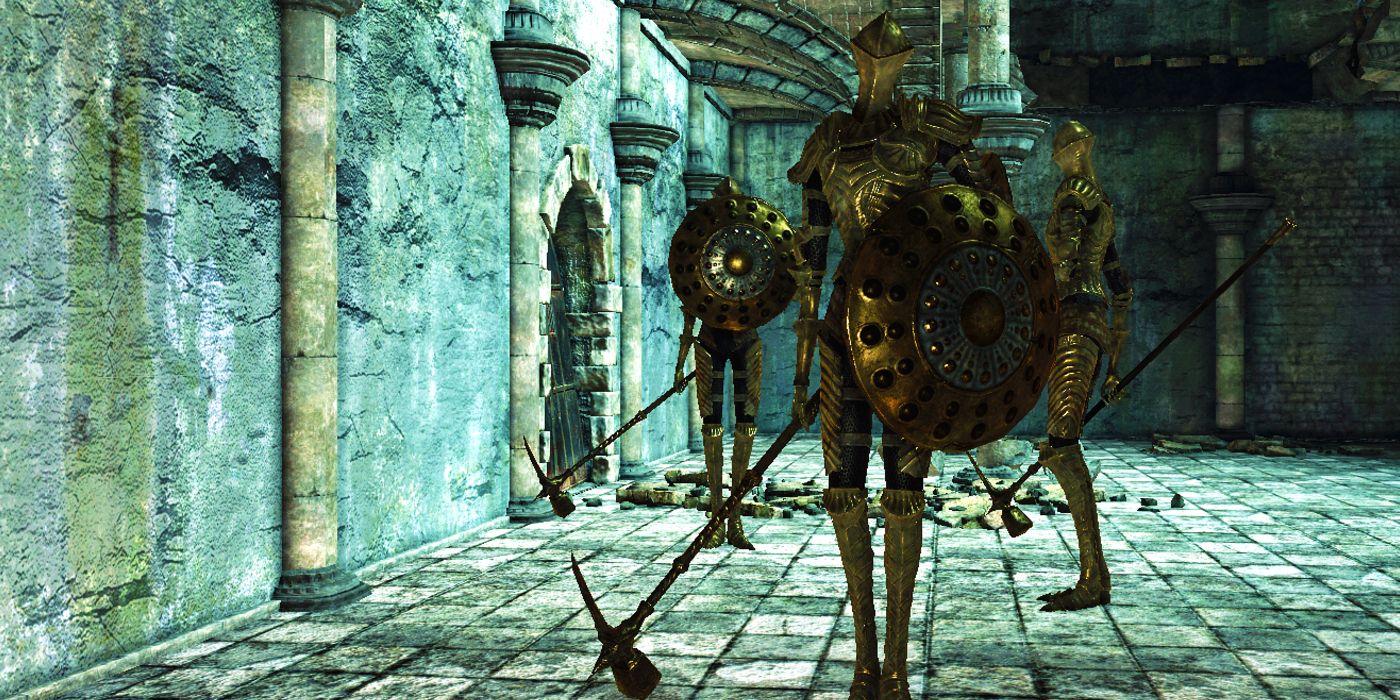
Players encounter the Ruin Sentinals rather early in Dark Souls 2, depending on which route they have at the kickoff of the game. It is possible to skip this trio of bosses, but not without first finding the Antiquarian Key and a Pharros Lockstone.
When one first encounters them, it is a scrap overwhelming considering the game throws the thespian into that one versus three scenario. Almost players encounter this dominate fight unprepared, and chop-chop get overtaken by the constant shield and hammer bashing. If the Bearer of the Curse missteps even once, these giants can quickly swarm the player earlier they can even mentally fix.
Tips For Defeating The Ruin Sentinels
The easiest manner to handle the Sentinels is to take advantage of the second-floor landing that players will drib onto when entering the boss fight. Stay here and don't jump down. This will typically cause only 1 Sentinel to leap up and attack, while the other ii hang out on the basis for a while.
Fight the Sentinel one-on-one, and wait for the side by side one to jump upwardly. Players tin also use the assistance of the summon from the hallway before the boss room. This spirit is able to tank many of the Sentinels' attacks while the player fries abroad their health.
13 Belfry Gargoyles
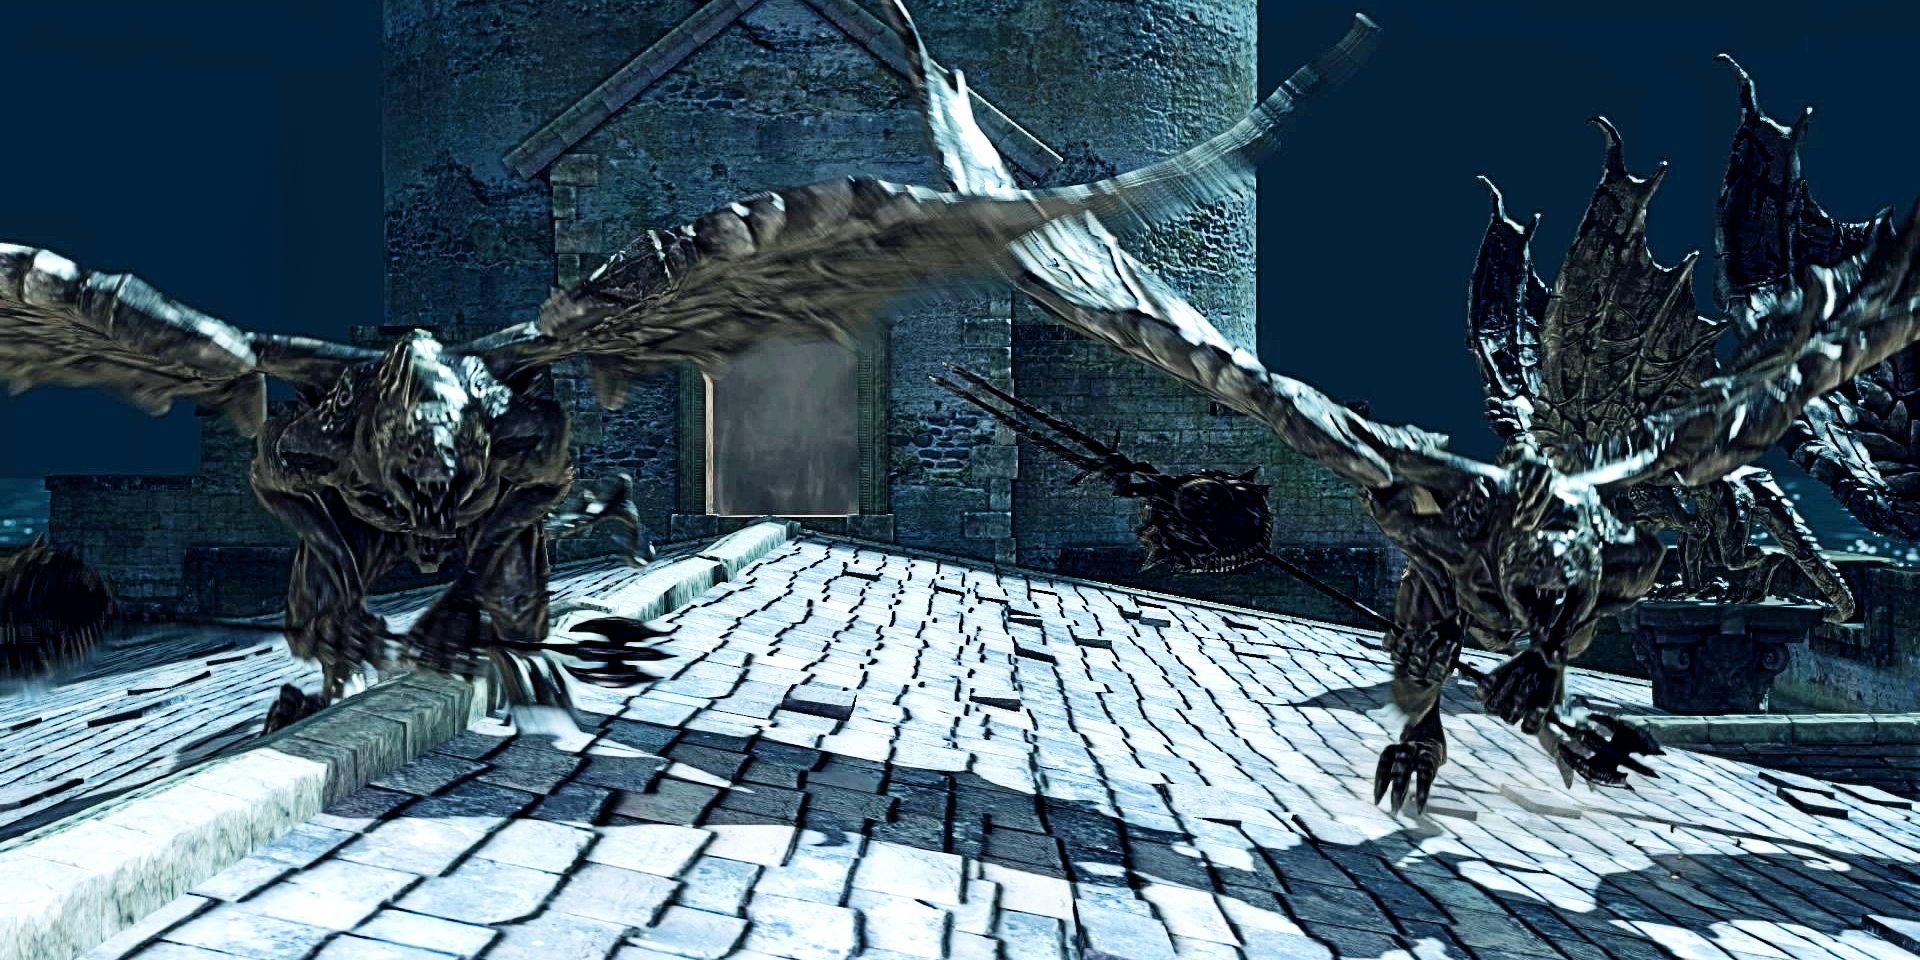
The Belfry Gargoyles are another optional boss, and one that is probably all-time to skip. They are some other with multiple enemies, which stacks the odds against the player. In total, there are vi gargoyles that come into the fight ane at a time. The spawn charge per unit for them is rather short, notwithstanding, and if they aren't finished off fast enough, players tin easily get overwhelmed by their numbers.
If that wasn't bad enough, when a gargoyle'southward health is reduced to one-half, they start to breathe fire which can easily destroy the player when dealing with multiple gargoyles. Make sure to at least go into this fight with some golden pine resin for that much-needed lightning buff on the actor's weapon.
Tips For Defeating The Tower Gargoyles
Speed is the key to defeating this dominate easily. When no help is available, players should try to take out one gargoyle at a time. Remember that the fight starts with ii gargoyles, and the 3rd won't spawn until the overall boss health is less than 90%. Focus on one gargoyle and use pine resin if possible. Also, call up that the physical attacks from the gargoyles can exist parried. This is useful to know when dealing with a small number of them.
12 Sir Alonne

Sir Alonne is ane of the many bosses from the DLC, and the final boss at the end of the Memory of the Onetime Iron King. It is important to know that getting to this boss is a feat in itself due, every bit the histrion must plow through an army of Alonne Knights just to achieve his fog wall.
Sir Alonne's difficulty comes from his awkward assault patterns with weird timings. He also has a loftier defense confronting all forms of magical harm, so physically damaging items are a must. In that location is a overnice reward if one can manage to kill him flawlessly within a specific time. If done, he will actually commit seppuku, a form of ritual suicide committed by samurai.
Tips For Defeating Sir Alonne
1 way for players to get more than of a fighting adventure against Sir Alonne is to use Havel's Greatshield, which tank quite a few hits and keep players sturdy on their feet. Wait for openings and attack. Always exist sure to avoid the soul-piercing assault since shields cannot block it.
Dodging tin exist easy if a player has a fast dodge and they dodge to the correct. Alonne typically swings his katana from his right and ends the assail on his left. Dodging to the right will allow players to more easily avoid damage.
11 Afflicted Graverobber, Ancient Soldier Varg, & Cerah The Old Explorer
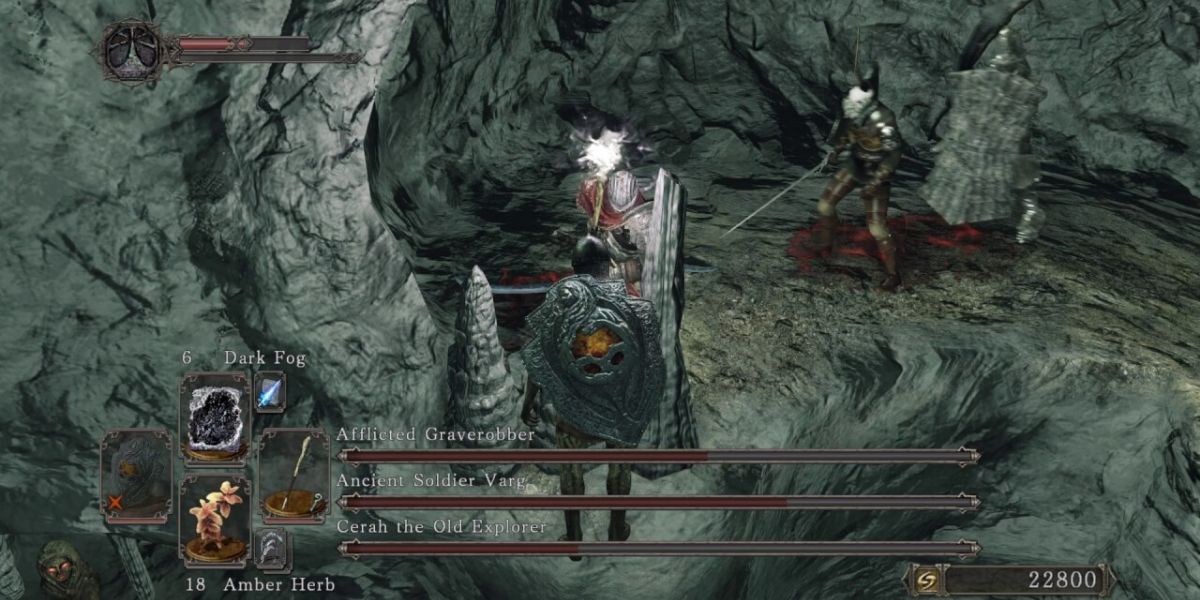
Often referred to past many Night Souls 2 fans as "The Gank Squad," these bosses are another example of a 3 versus one scenario. Information technology is very obvious that these bosses were meant to be fought with summons, but it has been done solo as well.
Cerah really makes this fight difficult, staying back and firing great arrows. While that is going on, the Graverobber and Varg volition fight head-on. Many players have fallen victim to this unfair trio. At to the lowest degree the thespian gets two summons before the dominate fight if they choose to face this trio without other players or are playing offline.
Tips For Defeating The Afflicted Graverobber, Aboriginal Soldier Varg, & Cerah The Old Explorer
It is of import to go after the Afflicted Graverobber start since he is the fastest of the trio. If possible, e'er summon some spirits to help in the fight. If that cannot be done, have fourth dimension to practice parrying, since it will come in handy when dealing with the Graverobber. Bargain with Varg last, since he has the highest health puddle. His attacks are slower and he moves the slowest of all the bosses.
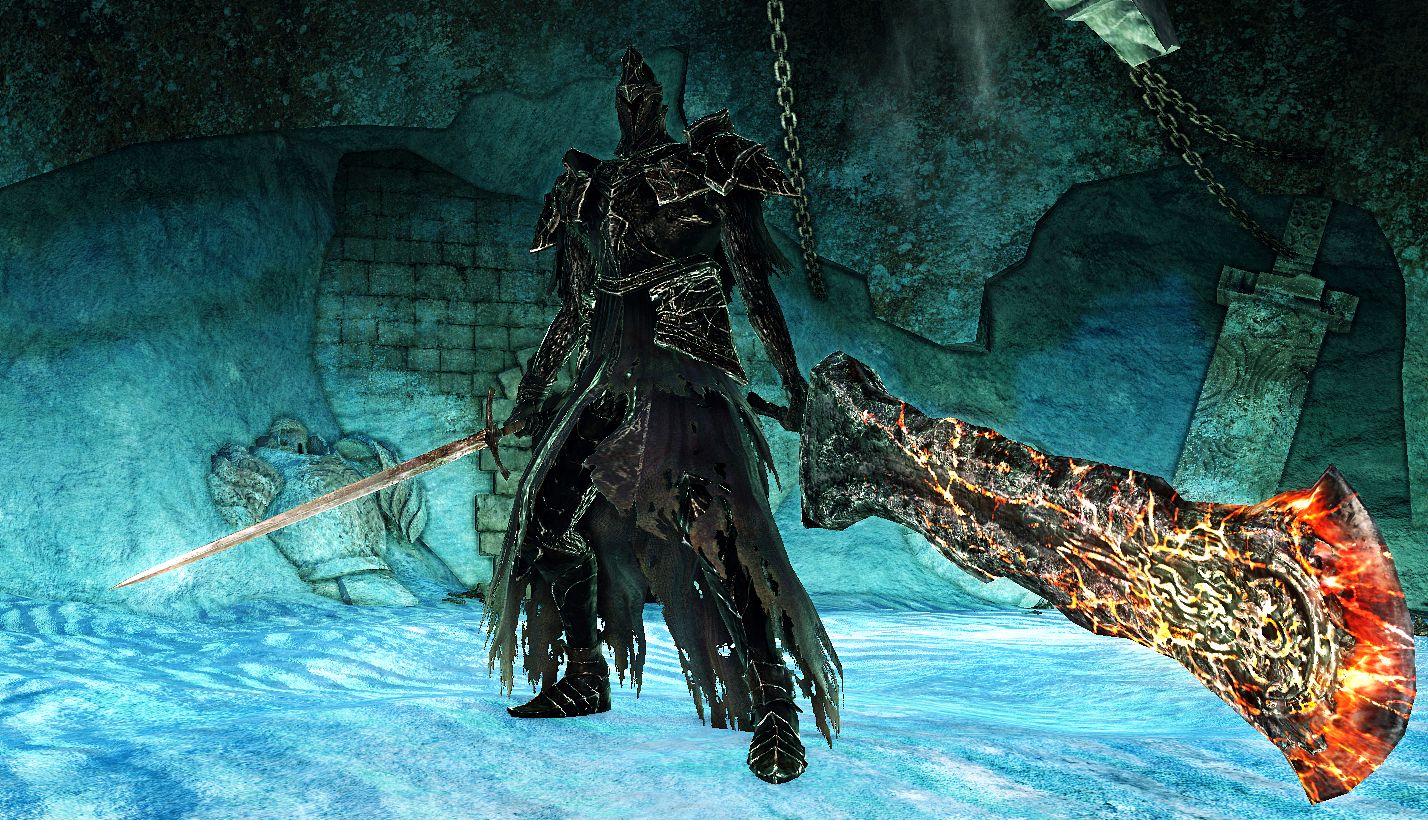
10 Looking Glass Knight
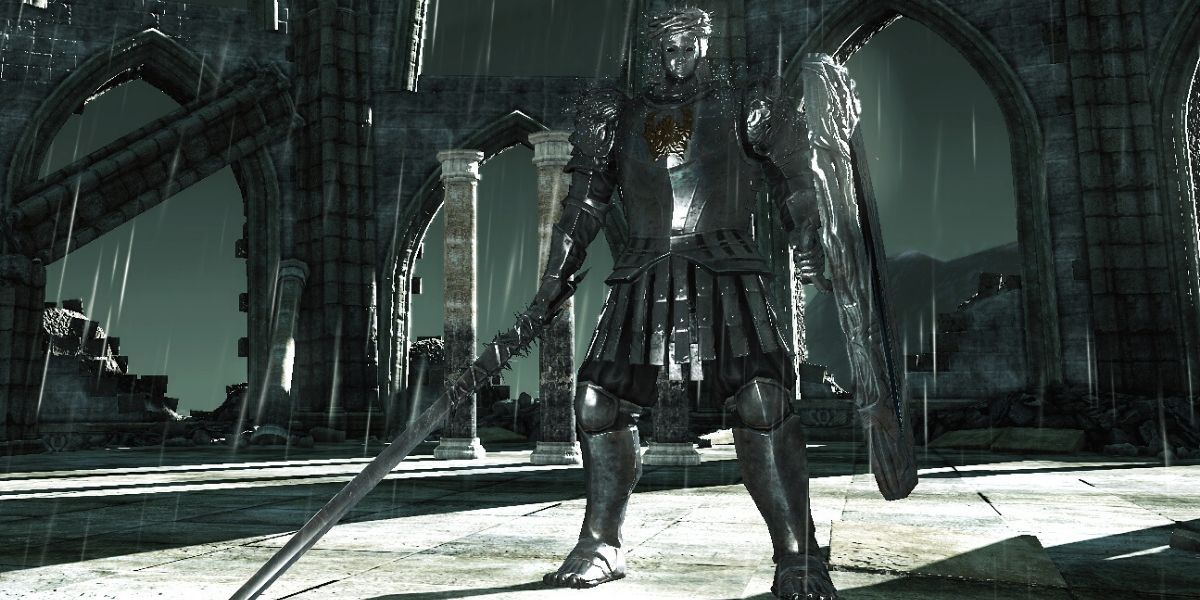
The Looking Drinking glass Knight's difficulty comes from his massive defence and the fact that he tin can summon allies to help him . Taking this boss on solo is non recommended, because not simply tin can he summon AI allies, just players as well. If a thespian places their invasion sign downward in the right area, then they can go summoned into the boss fight, which is a major disadvantage.
This wouldn't be and then bad if the NPC that the histrion can summon was practiced. Before the boss fight, the player tin can summon Benhart, but he is hardly useful because he never blocks and typically dies very fast. This leaves the player with a boss that has boosted stats, to deal with one on one.
Tips For Defeating The Looking Drinking glass Knight
Players can employ the NPC summon to their advantage and attack the Looking Glass Knight from behind while he focuses on Benhart. Keep aware of the boss' attacks, since they can become rather predictable. When the boss tries to summon an NPC, he will slam his shield onto the basis. This can be interrupted by breaking his poise. Brand sure to utilize heavy attacks to aid stagger the dominate whenever he tries to summon an marry.
9 Throne Watcher & Throne Defender
The Throne Watcher and Throne Defender come late in the game. Typically, they are fought just before the final boss, but can be battled early to brand things a little easier at the end. Summons are recommended, because the 2 of them together can be besides much for a single player to handle.
This boxing is made more than difficult when they each have half health due to them enchanting their weapons. Make sure to keep an center on the Throne Watcher because they accept a ranged set on that they can use while one is preoccupied with the Throne Defender. The player can brand the fight easier past luring one of them off the ledge on the side of the loonshit.
Tips For Defeating The Throne Watcher & Throne Defender
This duo is relatively tricky, only players tin can cheese them past leading them over to the edge of the loonshit. Dodging at the right fourth dimension here can cause whichever boss is attacking to autumn off the ledge. When dealing with the bosses, recollect that they need to be killed within 20 seconds of each other. It is important to attack both of them and keep their health at about the same amount throughout the fight. If one boss is killed and their body remains in the arena, the other dominate will revive their fallen ally.
8 The Duke'south Love Freja
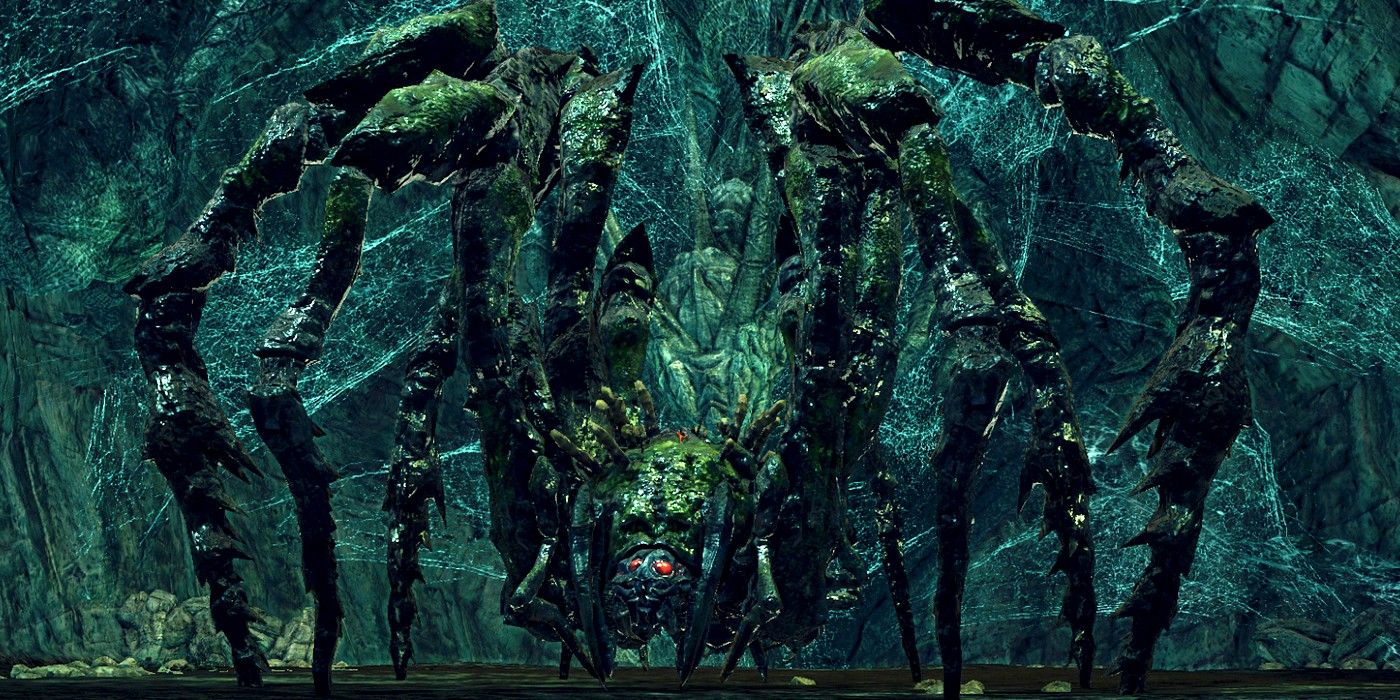
Not but is the journey to this boss from the nearest bonfire a huge pain, but the dominate room itself gets literally swarmed by foes. As if one big two-headed spider that shoots lasers isn't bad plenty, the histrion must also contend with the hordes of much smaller, notwithstanding nevertheless quite large, arachnids hellbent on nipping at the Bearer of the Expletive's heels.
Thankfully, there is a way to subdue the more minor threats by lighting a torch, which causes them to abscond from the player. It'due south also worth noting that fire impairment is very effective on Freja, though does not scare her quite as much as it does her children.
Tips For Defeating Freja
The best manner to deal with Freja is to bait out her axle attack. Later it ends, run in and attack her head, then leave of the way of her legs or lunging assault. And as mentioned above, make certain to carry a torch into the boss room.
seven Darklurker
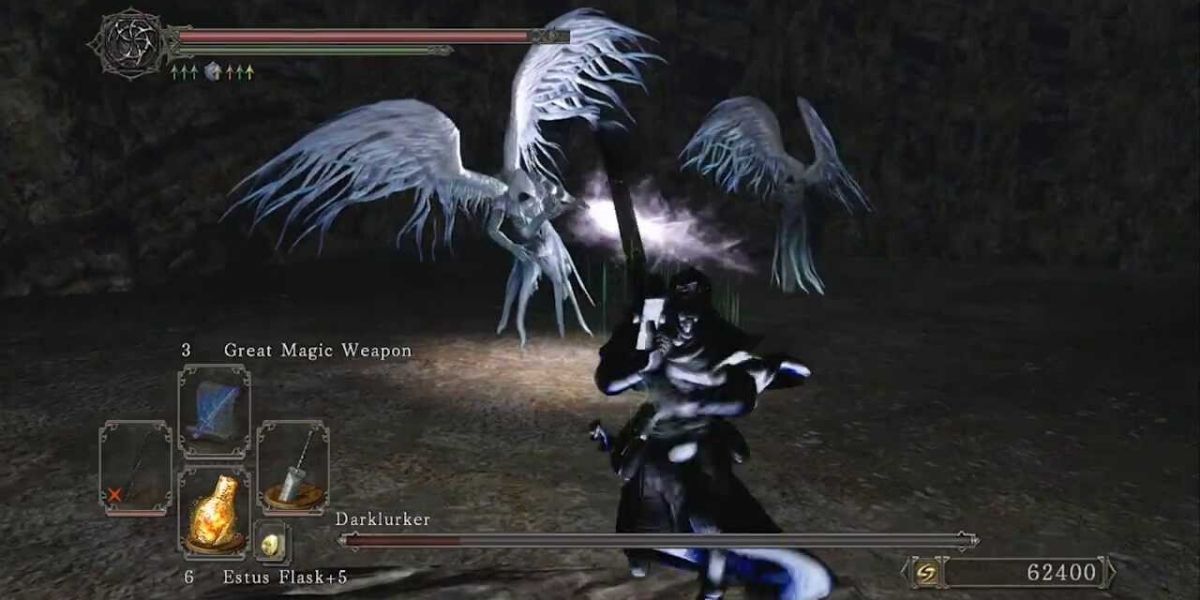
The Darklurker is one of the optional bosses, and takes quite a bit of time to reach if i decides to fight it. First, the player must find Darkdiver Grandahl, go into each of the three Dark Zones, and light the fires. Once that is washed, ane tin can fight this monster — which is easier said than washed.
The dominate fight is pretty straightforward until it reaches half health. Then the Darklurker splits into two bosses that each need to be killed. One of the worst parts about this fight is that it must be done lonely, because no summons are immune in the Dark Chasm of Quondam.
Tips For Fighting The Dark Lurker
The Darklurker is extremely weak to both lightning and fire attacks, making fight is easier for players who accept access to these spells. Spamming these attacks can easily deplete the Darklurker's health pool. Players who are using melee weapons may want to switch out their weapon for one that has lightning or fire impairment on it.
half dozen Smelter Demons
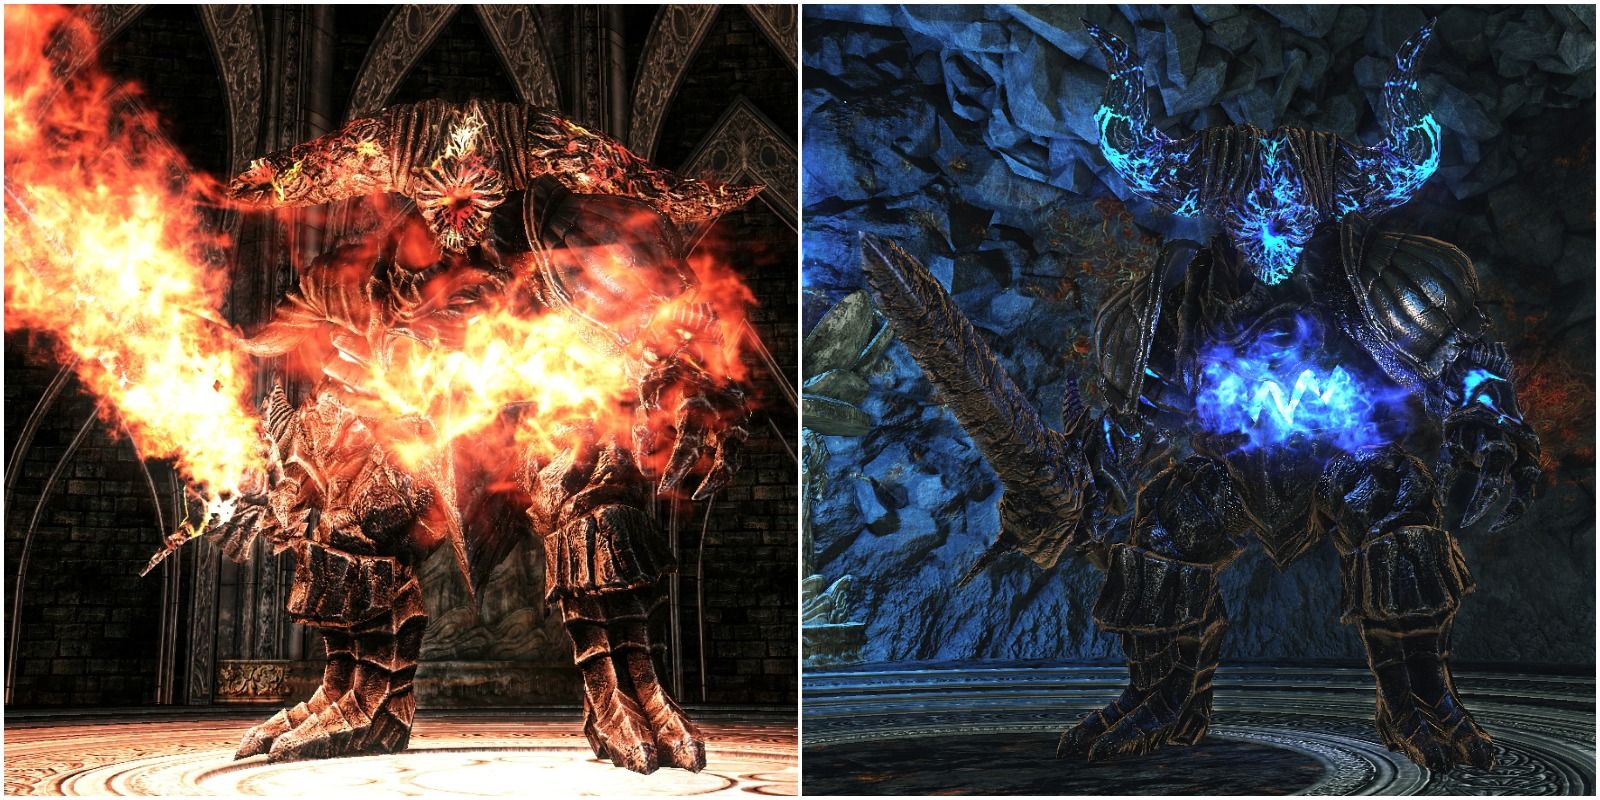
That'southward right, in that location are two. Luckily each one is a separate dominate fight, but each is a challenge to defeat. The Smelter Demon deals significant physical damage and, at about lxx pct health, will stab himself with his sword ,causing it to catch fire. This makes all of his attacks modify and deal fire damage.
His stab set on volition send out a jetstream of fire and his leaping set on has the potential to go an AOE assail that deals meaning fire impairment as well. Lucatiel of Mirrah can be summoned for this fight, but it is more recommended to summon a player because she can die rather apace.
Tips For Defeating The Smelter Demons
Make sure to enter the boss fight wearing armor that has good burn down resistance. Once the boss loses virtually a tertiary of its health, it volition scream. This volition initiate a damaging fire AOE around information technology at all times.
Equipping the Ring of Restoration will help deal with the fire AOE impairment. Pay attention to the boss' attacks and dodge mainly to the left. Be careful to stay abroad from the wall since the dominate' big frame tin go a histrion stuck confronting the wall.
v Ancient Dragon

The Ancient Dragon is regarded as one of the toughest bosses in the game — not because of powerful attacks that aren't telegraphed, but rather the overly big corporeality of wellness that information technology possesses. It is recommended to have a few summons for this fight, otherwise it can last an extremely long time.
The boss mainly deals fire damage ,but will likewise assail with its claws and tail if players linger around it for too long. It also has the potential to fly up into the air and cast a very big AOE attack that reaches almost the entire loonshit. Information technology is highly recommended to wear armor with adept fire resistance earlier attempting to take on this behemoth.
Tips For Defeating The Ancient Dragon
The best fashion to make this boss fight easy is to go every bit much fire resistance as possible. This tin can exist done by equipping the Flame Quartz Ring +2 (100 fire resistance), Dispelling Band (60 fire resistance), Dragon's Molar (50 fire resistance), and loftier burn down-resistant armor. Players volition as well want spells like Flash Sweat to further increase their resistance. After all this, the boss fight should be rather trivial, since the fire damage will be taken out of the equation.
4 Sinh, The Slumbering Dragon
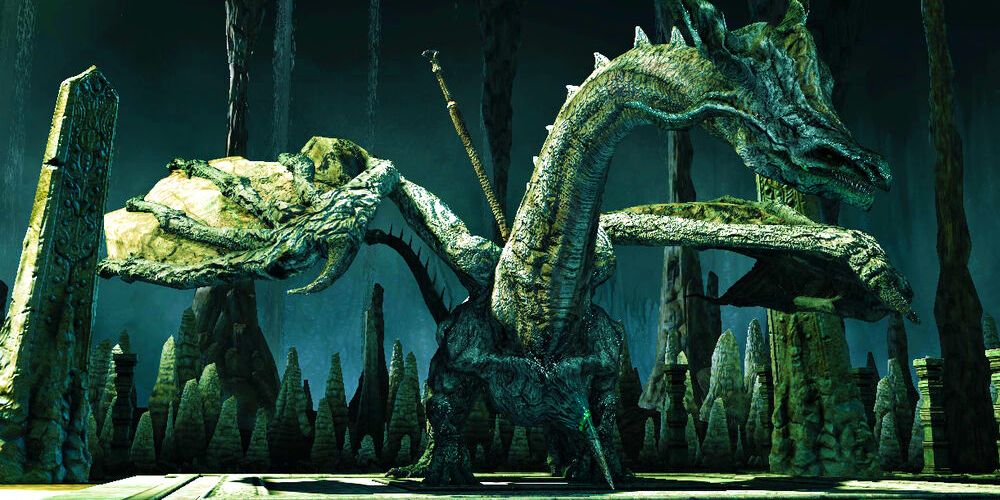
Despite having a spear through their chest, Sinh is 1 of the mightiest bosses in the entire game. The only true dragon in Nighttime Souls 2, they stand for their deadly kin very well.
Their flight-based attacks are tricky to dodge as Sinh locks onto the actor with an unexpected delay for very bad-mannered timing. Meanwhile, their aerial flamethrower dive tin scorch the player if fifty-fifty a separate-second off while combat rolling. On top of all this, Sinh is stiff enough to stun or stagger the player long enough to prevent them from dodging their subsequent broad-ranging attacks.
Tips For Defeating Sinh
Ane of the most helpful things a player tin can do is increase their poison and burn down resistance. When dealing with Sinh, it is easiest to bait him into using his flamethrower attack. This attack is easier to dodge than others, and leaves him open to attacks subsequently.
3 Lud And Zallen, The King'due south Pets
This boss fight has undeniably the worst lead-upward in Dark Souls 2, and possibly the unabridged trilogy. The numerous enemies that assault the player while they are traversing through a blizzard are tedious plenty without having to trek through a ton of snow and ice. Low visibility, no bonfires, and a very tiresome surface area brand the path to Lud and Zallen downright awful.
When the role player finally reaches the boss room they are greeted by an unfair fight with two bosses nearly identical in moveset to one previously defeated by the Bearer of the Curse. The only existent counter to the irksome atomic number 82-upwardly and boss boxing is to summon a bunch of allies at the very first of the Frigid Outskirts.
Tips For Defeating Lud And Zallen
Bargain with Lud starting time, every bit this will help later in the fight. Avoid Zallen and go on attacking Lud once Zallen joins the fight. This will assistance limit how long the role player will be fighting two bosses.
When Zallen gets low on health, they will enter an enraged style, where they deal more damage and attack relentlessly. Continue dodging for about thirty seconds. Zallen volition furnish some health during this time, but attacking won't really help prevent that. One time they are no longer enraged, get in for the impale.
2 Elana, Squalid Queen
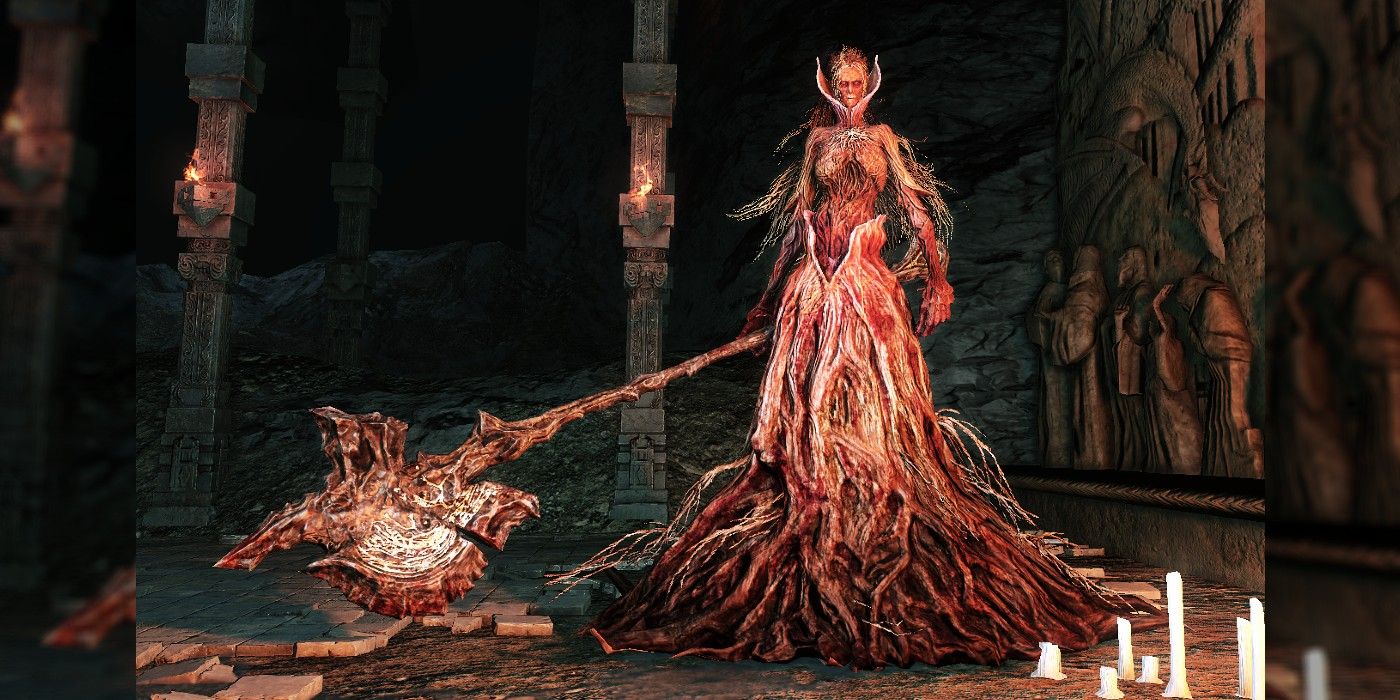
Guarding the way to Sinh'due south boss room is another boss, though many consider her much harder than the same dragon. Elana, Squalid Queen casts a diverseness of dark and fire spells at the player, in addition to cleaving at them with her massive axe. All the same, her most hated tactics are when she summons allies.
Her three skeletal minions are quite the nuisance, but the biggest threat is that she summons another boss to assist her. This is the but situation where such a thing happens in the whole game. In her time of need, Elana volition summon a filthy mud-clone of Velstadt, which in combination with her attacks and possibly a trio of skeletons, tin make this a tremendously lopsided five-on-one battle.
Tips For Defeating Elana
When inbound the dominate fight, attack Elana as much as possible. It takes her a while to spawn her weapon in and for the fight to officially brainstorm, and so this is the best time to bargain some heavy damage to her.
After this, the fight will become much easier, since it tends to be a one on i if the role player attacks fast enough. If she manages to summon her allies, attack them first while keeping an eye on Elana. She volition mainly move around while her summons are out, but volition occasionally go later the histrion from backside.
1 Fume Knight
The Fume Knight is known by many every bit the hardest boss in all of Dark Souls 2. He doesn't use many attacks that are telegraphed, and prefers to use those that are slightly delayed to throw players off. He has a potent resistance to all types of magic, so physical damage is preferred when taking him on.
He is one of the few enemies that utilise dark and burn down magic that is strong enough to harm the histrion, even when using shields that resist 100 percent burn down impairment. All of this, combined with a smaller boss arena that tin throw off the photographic camera, make this boss extremely difficult to deal with.
Tips For Defeating The Fume Knight
During the first stage of the fight, run up on the dominate and get in some costless hits while he is actualization. In phase one, it is easier to dodge the Fume Knight while hugging his left knee. Watch out for the pocket-size indications of attacks from his greatsword. During each of the phases of the boss fight, the player can go a few free hits on the boss when he transitions.
In phase two, watch out for the greatsword attacks, since that will be his just weapon. It is now infused with dark burn down and deals more damage. Make sure to come into the fight with practiced dark and burn down resistance, which will help negate some damage from his attacks.
About The Author

flanneryandismake.blogspot.com
Source: https://gamerant.com/dark-souls-2-strongest-bosses/
0 Response to "List of Dark Souls 2 Bosses Ds2 Looking Glass Knight Art"
Post a Comment